Setting Up
Setting Up
About this guide
If you're a Matomo user and need Matomo to do something it doesn't do; or maybe you use another web app and want to integrate it with this amazing analytics software you've heard so much about (Matomo, naturally) — well, you've come to the right place!
This guide will show you:
- how to get your development environment set up,
- how to create a new Matomo Plugin,
- and where to go next to continue building your extension.
Guide assumptions
This guide assumes that you can code in PHP and can set up your own local webserver. If you do not have these skills, you won't be able to understand this guide.
There are many resources on the internet to help you learn PHP. We recommend reading these tutorials. To learn how to set up a web server read the documentation for your preferred web server software (for example Apache or Nginx).
Matomo Plugins and Matomo Core
All the functionality you see when you use Matomo is provided by Matomo Plugins. The core of Matomo (termed Matomo Core) only contains tools for those plugins.
If you want to add more functionality to Matomo, create your own plugin then distribute it on the Matomo Marketplace so that others can use it.
Note: If you want to integrate another piece of software with Matomo and you only need to know how to track visits or how to retrieve reports, read more about Integrating Matomo in your application.
What is possible with Matomo plugins?
You can accomplish the following by creating a plugin:
- track new visitor data and create new reports to aggregate it
- track third party data and display it in new reports
- show existing reports in a new way
- send scheduled reports through new mediums or in new formats
These are only a few of the possibilities — it is not possible to categorize all the existing plugins' functionality simply because of the vast differences in their use cases. For example, the Annotations plugin lets users add notes for dates without requiring modifications to Matomo Core. The DBStats plugin will show users statistics about their MySQL database. The Dashboard plugin provides a configurable way to view multiple reports at once.
Whatever ideas your imagination cooks up, we think you can implement them with Matomo.
If you can't think of an idea for a plugin, you can check the New plugin label on GitHub or adopt an existing, not maintained plugin.
Getting setup to extend Matomo
Get the appropriate tools
Before we start extending Matomo, let's make sure you have the tools needed. You will need the following:
- A PHP IDE or a text editor. We recommend using PhpStorm, a powerful IDE built specifically for developing in PHP.
- A webserver, such as Apache or Nginx. You can also use PHP's built-in webserver on your development machine if you have PHP 7.2.5 or higher installed.
- A MySQL database
- git so you can work with the latest Matomo source code.
- Composer so you can install the PHP libraries needed by Matomo.
- A browser, such as Firefox or Chrome. Ok, you've probably got this.
The following tools aren't required for this guide, but you may find them useful as you create your plugin:
- PHPUnit Necessary if you want to write or run automated tests.
- xhprof If you'd like to profile your code and debug any inefficiencies.
- python If you want to use the log importer.
Important Note for Windows
It is possible to develop Matomo On Windows, but some things will not work as well. Specifically, Windows users coding with Vue may encounter problems with compiling Vue code. This is currently an unsolved problem, and we'd happily accept contributions that would help Windows users have an easier time contributing to Matomo.
Command to get the tools on Linux
If your computer is using a Debian based operating system, you can install all the required packages with the following command:
$ sudo apt-get install php php-curl php-gd php-cli mysql-server php-mysql php-xml php-mbstring
Get & Install Matomo
We'll get the latest version of Matomo's source code using git.
Open a terminal, cd into the directory where you want to install Matomo, and then run the following commands (without the leading $):
$ git clone https://github.com/matomo-org/matomo matomo
$ cd matomo
$ git submodule update --init
Get & install Composer
Next, we will install all the libraries that Matomo needs using Composer.
Follow the download instructions for Composer in order to get composer on your machine
Then run this command to download all PHP packages that Matomo requires:
$ php composer.phar installOn Windows, you will likely need to add an option
--no-script:$ php composer.phar install --no-script
Get a web server
Now that you've got a copy of Matomo, you'll need to point your web server to it. If you use Apache or Nginx, the specific instructions for configuring your web server depend on the web server itself.
If your PHP version is 7.2.5 or greater, you can also use PHP's built-in web server which requires no installation. Simply run the following command:
$ php -S 0.0.0.0:8000
Matomo should now be available at http://localhost:8000/. To stop the web server, just hit Ctrl+C. Remember that PHP's built in web server is only suitable for development. It should never be used in production.
Install MySQL and create a database
When you install Matomo, at the database creation step, you will need to specify your database user.
-> Click here to see how to create a new user in MySQL.
In Ubuntu systems running MySQL 5.7 (and later versions), the root MySQL user is set to authenticate using the auth_socket plugin by default rather than with a password. To use a password to connect to MySQL as root, you will need to switch its authentication method to mysql_native_password. To configure the root account to authenticate with a password, run the following ALTER USER command, and replace my secure password by a secure password:
ALTER USER 'root'@'localhost' IDENTIFIED WITH mysql_native_password BY 'my secure password';
If you are developing with Matomo then we usually recommend using the "root" database user in Matomo as various database tables may be created when running tests.
Install Matomo
Once Matomo is running, open it in your browser and follow the instructions to complete the installation.
Adding anonymous access to your reports
Before we finish, we're going to allow anyone to view reports on your new Matomo environment. Open the Administration dashboard (click on the cog icon), go to System > Users page and choose View in the Role column for the anonymous user:

This will make it possible to view raw report data without having to supply a token_auth.
Enable Development mode
After installing Matomo, we're going to change some of Matomo's INI configuration to make development easier and to make sure all changes take effect immediately. Matomo comes with a handy command-line tool that will do this work for you. In the root directory of your Matomo install, run the following command to enable development mode:
./console development:enable
Add some test tracking data in your Matomo
You're now ready to create your first plugin, but before we do that, let's add some test data for you to play with.
In your browser, load Matomo and navigate to Platform > Marketplace on the Administration dashboard. Look for the "Visitor Generator" plugin and enable it. Then on the admin menu to the left, click on Development > Visitor Generator.
On this page you'll see a form where you can select a site and enter a number of days to generate data for:
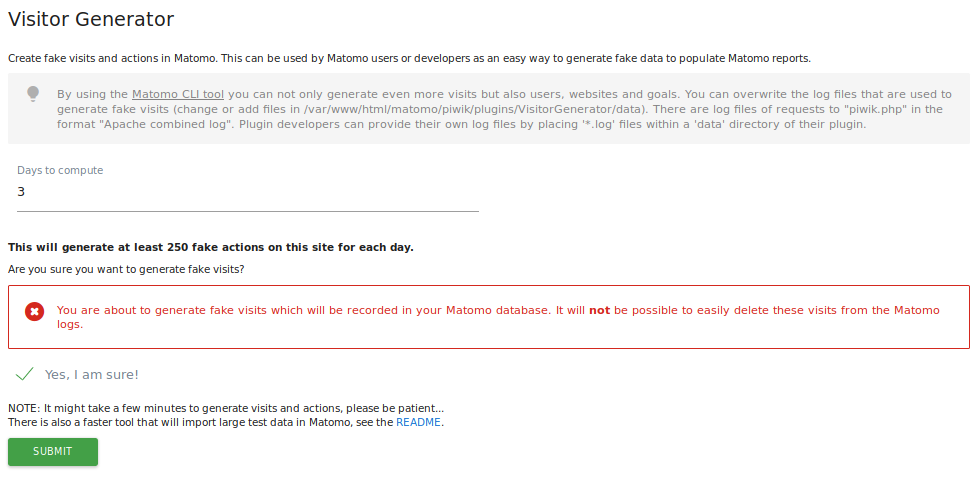
Let's generate data for three days. Enter 3 in the Days to compute field, check the Yes, I am sure! checkbox and click Submit.
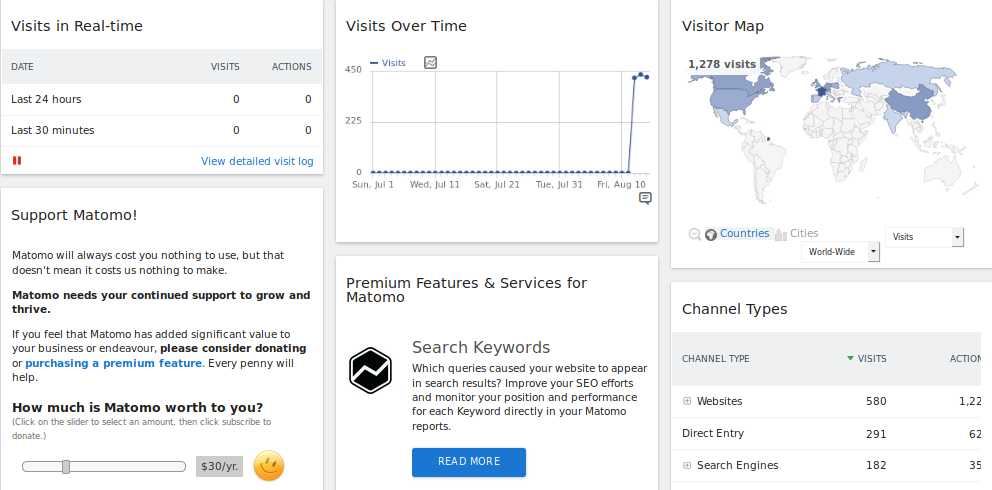
Once the visits have been added, click on the Dashboard link at the top of the screen. You should see that reports which were previously empty now display some statistics:
If you want to execute the automated test suite
Make sure you have pulled Matomo's source code using git, an installation from an archive does not support running automated tests.
Set the following configuration options in config/config.ini.php:
[database_tests]
host = "127.0.0.1"
username = ...
password = ...
You also may have to create the matomo_tests database:
mysql -u'db_username_here' -p -e 'CREATE DATABASE matomo_tests'
The configured DB user for the tests should also have privileges to create and drop databases.
For more detailed instructions you can visit the PHP Tests page.
Create a plugin
Your development environment is set up, and you are now ready to create a plugin!
First of all, you need to choose the plugin's name. Remember, if you're going to publish on Matomo's marketplace, CamelCase will be split into words. So, for example "MyPlugin" will be published as "My Plugin".
Creating a plugin consists primarily of creating a couple of files which can be done by running the following command:
./console generate:plugin --name="MyPlugin"
This will create a new plugin named MyPlugin.
You can use any name for your plugin, but this guide will assume you've created one named MyPlugin. If you use a different name, make sure to change MyPlugin to the name you used when copying the code in this guide.
In your browser load Matomo and navigate to Administration > Plugins. Look for your plugin in the list of plugins, you should see it disabled:

To enable it, either do it through the web interface or use the command line:
./console plugin:activate MyPlugin
Plugin directory structure
The command-line tool will create a new directory for your plugin (in the plugins sub-directory) and fill it with some files and folders. Here's what these files and folders are for:
MyPlugin.php: Contains your plugin's descriptor class. This class contains metadata about your plugin and a list of event handlers for Matomo events.plugin.json: Contains plugin metadata such as the name, description, version, etc.README.md: A dummy README file for your plugin.screenshots/: Place screenshots of your plugin in this folder in case you want to distribute it on the Matomo Marketplace.
Troubleshooting Local Development
- The admin pages in my local setup are TOO slow: This is caused by the Marketplace plugin running in the background. If you disable the plugin, admin pages will load much faster for you. You can manage plugins on the Administration dashboard, System > Plugins page. (Do remember to enable it if you ever need to work on code that uses it.)
What to read next
Ok! You've set up your development environment and created your plugin! Now all you have to do is make it do what you want. The bad news is that this is the hard part. The good news is that we've written a bunch of other guides to help you shorten the learning curve.
- If you're interested in creating new analytics reports, you may want to read about Custom Reports and Visualizing Report Data guides.
- If you're interested in changing the look and feel of Matomo, read the Theming guide.
- If you're interested in integrating Matomo with another technology, you might want to read the Tracking guides to learn how to use the Tracking API.
- If you want to use automated testing to ensure your plugin works, read the Automated Tests guide.
And make sure to read our security guide, Security in Matomo (formerly Piwik)! We have very high security standards that your plugin or contribution must respect.
When you've completed your plugin, you can read the Distributing your plugin guide to learn how to share your plugin with other Matomo users.